Posted on

Aqara Thermostat Hub W200 Review: The Best Thermostat For HomeKit

The headline feature, and the reason a lot of people will be looking at the W200 in the first place, is native support for Apple’s Adaptive Temperature. Instead of building out a traditional 7-day schedule, Adaptive Temperature leans on your iPhone and Apple Watch location data to figure out when you’re home, away, or asleep, and adjusts the thermostat accordingly. If you turn on Predict Arrival, it’ll start pre-heating or pre-cooling the house before you usually get back from work. Extended Away mode widens the setpoint range when you leave town for a few days.

In practice, this works well, and if your schedule isn’t particularly volatile, it’s arguably a better approach than manual scheduling. It just quietly keeps the house comfortable without you thinking about it. The trade-off is that Apple Home’s scheduling system has some gaps. You can’t, for example, set night mode to kick in later on weekends than on weekdays. That means you’ll probably end up back in the app to fill in the blanks or control the thermostat manually as needed.

Clean Energy Guidance is the other iOS 26 feature, and it’s more regional. It makes small, automatic adjustments when the grid is cleaner or when dynamic pricing is favorable. Rate optimization currently works with PG&E if you connect your utility account, so if you’re in California like I am, this is useful — but again, keep in mind that the adjustments will be small. Elsewhere, it’s more of a carbon-aware nudge than a bill-saving tool, for now.

Compatibility-wise, the W200 supports most 24 VAC systems, including furnaces, ACs, heat pumps up to 2H/2C with 2-stage auxiliary, boilers, and PTACs. It should work with a large portion of HVAC systems. What it doesn’t work with is high-voltage systems (110V, 120V, 240V) or proprietary communicating setups. A C-wire is required, which, again, means you’ll need the $29.99 adapter if your system doesn’t have one.

The integrated mmWave radar is a smart addition. It uses tech that Aqara has built for other devices, like its dedicated presence sensor. It detects extremely precise movements, not just obvious motion, with a range of about three meters and a 120-degree field of view. That means it knows you’re there even if you’re sitting still on the couch, because you’ll at least be moving a little.

Beyond waking the display, you can use that presence data for automations across the rest of your smart home, like turning on lights when you walk by, for example. It’s not as sophisticated as Aqara’s dedicated FP2 sensor, which can distinguish zones within a room, but it’s a nice bonus for a thermostat — and I hope we get more features and sensors in smart home devices like switches and thermostats. It just makes sense.

The core thermostat features work well. Heat, Cool, Auto, and Away modes all behave exactly as you’d expect. There are also some nice advanced touches, like a minimum compressor runtime setting to prevent short-cycling.

There are two notable omissions, though. First, there’s no way to set hardware temperature lock boundaries — meaning you can’t restrict how high or low someone can crank the setpoint. Second, the W200 only supports one external temperature sensor at a time. No multi-room averaging or the ability to select different sensors for different times of day.

Source

Posted on

Never Buy Refurbished Tech Without Asking These 5 Things First

person holding a iPhone inside a box against a white wall Funstock/Shutterstock

In the past decade, the market for refurbished products has grown significantly. One of the main reasons many people now prefer refurbished products over new ones is the cost savings. You can easily save big when buying electronics if you go with refurbished items. And you are generally not compromising on anything, except for a slightly older device in many cases. Refurbished tech products from reputed sellers undergo rigorous testing, which includes cleaning, making repairs, and replacing faulty components, before the device reaches your hands. But not every seller is the same, and not every product is guaranteed to deliver the same experience.

That’s because some sellers actually conduct extensive inspections while others simply clean and repackage the product. The difference between the two might not be noticeable right away, but over time, it becomes apparent, and by then, it’s usually too late. Things like the device’s condition, battery life, available accessories, warranty, and the seller’s credibility are all critical and must be verified beforehand. This applies to every refurbished tech product, whether it is a laptop, desktop, smartphone, or tablet. An early investigation can save you from a lot of trouble down the line.

Keep in mind that refurbished products aren’t inherently subpar. It’s all about finding the right one from a certified or reputed seller. And for that, you need to ask all the right questions.

What’s the actual condition of the device

stack of eight laptops on a wooden table against a grey background Oleksandra Vinogradova/Getty Images

One of the most important questions you need to ask is about the product’s condition. With refurbished products, it can get a little confusing, since there’s no universally adopted grade or ranking for the product’s condition. A seller might label a product “Excellent” or “Good” even when it has visible scratches or worn-out buttons. That’s why it’s important to check the product’s actual condition. If there are photos available, carefully inspect the product’s body for scratches or damage. If you are buying one in person, this becomes a lot easier.

Also, always check the device’s battery health. For smartphones and tablets, look for products with at least 85% battery health. For laptops, you should look for a relatively low cycle count. Since the battery is one of the first components to show signs of aging, you naturally want something that will last you at least a year. Additionally, if you are getting a laptop, inspect the storage drive’s health and RAM’s condition to see if it’s about to fail. With the prices of storage drives and RAM rising in recent times, you need components that are still in relatively good health.

With there being little information about how long the product was initially used, or whether it was returned by the original buyer within a few weeks or after a year, the product’s current condition becomes all the more important. This gives you an idea of how long it may ideally last.

Does it come with a warranty

applecare and warranty screen on a iPhone placed on a woonden table PixieMe/Shutterstock

What happens when the refurbished product you purchased stops working or shows signs of malfunction? You will naturally want to get it repaired or replaced by the seller. That’s where the warranty comes in.

As we have stated earlier, refurbished products from companies like Apple or Dell undergo extensive testing. But this does not eliminate the possibility of issues surfacing down the line. The device may work fine for a week or two, but after a couple of months, issues like battery failure, overheating, or random shutdowns may appear. A warranty protects you against that. Without a warranty, you are left on your own, with no assistance from the seller.

The length of the warranty is just as important, and you should look for sellers offering the maximum coverage. Many offer a 30-day warranty, while for others, it goes up to 6–12 months. Samsung offers a 12-month warranty on refurbished smartphones. Devices that come with a longer warranty are, of course, slightly more expensive, but it’s usually worth paying the premium. You should also confirm who honors the warranty, whether it’s the seller itself or a third-party service. With OEMs, the process to claim warranty is generally seamless. It’s third-party retailers that you need to be careful with.

Who refurbished it, OEM or a third-party

technician inspecting a phone for problems with a multimeter and other tools placed on the desk Zheka-boss/Getty Images

This is possibly one of the most important aspects of buying refurbished products — finding out who actually refurbished it. That’s because not every refurbishment process is the same. Some are excellent, while others involve basic cleaning and testing. And it largely depends on the company handling it. OEMs generally do a better job, while with third-party sellers, it’s often a risky bet.

When a device undergoes refurbishment with an OEM like Apple, Samsung, or Dell, the process involves a wide array of checks, from quality to performance. Even the faulty components are replaced with genuine parts. In most cases, a device refurbished by an OEM should work just fine. But when it comes to third-party sellers, both the refurbishment process and product quality can vary dramatically. Some do a good job, while others may simply clean and factory reset a device before selling it.

That’s why it’s important to stick with OEMs for refurbished products. If you are going with a third-party, make sure to ask them about their refurbishment process and the checks conducted. If a seller doesn’t disclose this information, it’s best to avoid them.

Are the original accessories included

an open smartphone box with cable and adapter with the phone placed next to it Juan Ramón Ramos Rivero/Getty Images

When buying refurbished tech devices, always ask whether the package includes the original accessories. For bigger purchases, this may seem like an avoidable question. But if accessories are not included and have to be purchased separately, you will need to factor that into the total cost. In most cases, the product listing clearly mentions whether or not the accessories are part of the package. If it doesn’t, check that beforehand.

There are also cases where sellers ship the device with replacement accessories that are not manufactured by the OEM. In such cases, you will need to verify their quality. For instance, using a low-quality charger can lead to issues like overheating and battery degradation with use. Remember, photos alone may not tell the full story when it comes to accessories. Some sellers post generic photos, while the actual product you receive is entirely different and might not include the listed accessories.

That said, it’s also important to understand that a refurbished product can be a good deal even without the original accessories. It’s just that you should know that upfront to make an informed decision.

Is there a return policy

brown cardboard box with a yellow tape titled Return Maribel Falcon/Shutterstock

Sometimes, a product may not seem like the right fit after being delivered, even if it looked perfect online. Sometimes, major issues arise after a few weeks of use. In such cases, you will want to return the product, but that’s possible only if the product qualifies for a return, which is dictated by the return policy. For many sellers, this can be a week. For others, it can be a month, and a few may offer no returns at all. It’s important to verify this before making the purchase. A seller offering at least a 1-month return window is usually the safer bet. Dell offers a 30-day window, while Samsung and Apple let you return refurbished devices within 15 and 14 days, respectively.

Apart from the return window, it’s important to read through the fine print for clauses that may disqualify a return request or add to the cost. For instance, some sellers may require you to bear the expense of returns. Others may have stricter clauses when it comes to approving returns, and you may not qualify for one, even when raising a genuine concern. Asking these questions upfront can save you from a lot of inconvenience.

On your part, you should thoroughly evaluate the product within the return window to avoid unnecessary hassle. If you are buying a renewed Android smartphone or tablet, test its display, performance, battery, buttons, microphone, and speakers. For a laptop, focus on the RAM, storage drive, display, battery, keyboard, touchpad, and ports.

Source

Posted on

Here’s What A White Dot On Your Android Phone’s Screen

An Android phone screen with a white dot on the notification bar Wongsakorn 2468/Shutterstock

The status bar on Android phones provides several details about your device. It shows you how full the battery is, if it’s connected to Wi-Fi or data, the time, and any missed notifications, such as texts or calls. It’s useful for taking a quick glance to see if you have any unread messages or voicemails and allows you to see potential notifications before actually unlocking your phone to read or respond to them. Yet, there are even more symbols that can appear that you may not be aware of.

One such icon is a white dot that Android users have reported seeing near the top left or top right of the notification bar, though not all Android phones operate the same and many may not show a white dot at all. If the white dot does show on your Android phone, don’t worry — it just means there are more notifications, but their icons don’t all fit on the screen. The dot takes the place of them, letting you know there are more notifications you might want to see.

The additional notifications will vary and could come from any application you have downloaded to your phone. It’s not a glitch or fault, but a way to inform you that you have a lot of notifications. Don’t get the white dot confused with a green dot on your Android phone’s screen, though — that one can be a bit more urgent.

How to get rid of the white dot on Android phone screen menus

Icons with multiple notifications on the home screen of a smartphone Bbeiii/Shutterstock

Phone manufacturers and Google have not provided much official documentation online as to what the symbol means, but online forums detail what it is and how to clear it. For example, Reddit users say the white dot is just a combined way to show there are multiple notifications on your phone. They’ve discovered several fixes that make the white dot go away on the notifications tab.

One way to get rid of the white dot on your Android phone screen is to clear all of your notifications on the notification bar. To do this, unlock the phone, then swipe down on the screen to bring up the notifications, and select “Clear all” at the bottom. This should wipe the screen of all active notifications, including the white dot. Another solution is to clear each notification manually by selecting it to open the app or to swipe it away. Keep in mind that many settings choices may require the phone to be updated to Android 10 and up. Regular updates are important, and skipping one is something you should never do on your Android phone.

Another possible solution is to go into Android notification settings. Options could include not showing notifications for the lock screen or status bar, or showing all notifications for both. Again, options, wording, and location of notification settings may vary by phone.

Other symbols on Android phone screen menus

A woman looking at her Android phone Peopleimages/Getty Images

The status bar can show many different icons, and not all of them are easy to distinguish, like the white dot. There are dozens of symbols that can appear on the top bar, and each can be linked to a downloaded app or be tied to the phone itself, like Wi-Fi or mobile data. Application notifications on the bar can be turned off or on in the Android phone’s settings.

You can control notifications for each application downloaded to the phone. Keep in mind, the more apps you have installed, the less storage you’ll have, but Google is testing a new Android feature to solve storage problems. Icons like Wi-Fi, Airplane mode, data, and the battery symbol may not be able to be removed, but you should be able to clear application notifications.

With more apps comes the potential for more notifications to appear on the status bar. If your Android phone gets overwhelmed by the amount of notifications coming in, you’ll see the white dot in place of new notifications. To declutter the status bar, it all comes down to configuring what you want to be notified of in settings. Do that, and you’ll reduce the chances of seeing that pesky white dot in the future.

Source

Posted on

4 Common Battery Charging Myths You Should Stop Believing

Smartphone low battery symbol Pikusisi-studio/Getty Images

In the age of smartphones, wearables, laptops, and electric vehicles, our lives rely heavily on the power of batteries. More specifically, lithium-ion batteries. Over the years, we’ve seen major advancements to battery tech, including entirely new types of batteries popping up thanks to things like breakthroughs in sodium-ion battery research.

Despite that, though, many questions remain about batteries and how to get the most out of them. In fact, battery life has become one of the most important features to look for when buying a new phone, especially if you live an active lifestyle where you’re away from charging areas often.

Like any staple piece of tech we rely on every day, people have come to have some preconceived notions about batteries, how to use them, and what’s best for them. While it certainly is possible to charge your phone the wrong way, and some of these ideas about batteries are grounded in truth — like the fact that high temperatures can lead to battery damage — others are more like myths that people continue to believe because they’ve always heard them.

New batteries need to be charged to 100% before first use

Smartphone showing 100% charged graphic next to a USB block and outlet patpitchaya/Shutterstock

This myth is one originally grounded in truth, as it first began popping up as an instruction for new electronic owners back when nickel-cadmium (Ni-Cd) batteries were still the norm. The reason that this myth continues to exist today is because of how deeply it became ingrained in electronic users, and there’s a good explanation for that.

Previously used nickel-cadmium batteries suffered from what’s referred to as a “memory effect.” This basically meant that over time, recharging a Ni-Cd battery to a lower capacity could cause the battery to “remember” that capacity, making it the new amount of charge that the battery could hold. Most of this came down to the way that the chemicals within the battery contents crystalize over time. This meant that if you repeatedly used a Ni-Cd battery to say 30% and then charged it up to 75%, the battery’s chemical makeup would remember it because it would crystallize, thus leading to a reduced overall capacity.

Thankfully, this isn’t really an issue anymore, thanks to advancements made with lithium-ion batteries. They have a different chemistry than nickel-cadmium batteries, so their performance isn’t affected by those partial charge cycles in the same way. Because of this, you don’t need to worry about charging your new smartphone up to 100% before using it, though it’ll certainly save you from having to rush to find a charger later on.

Charging your phone to 100% will damage your battery

Person holding a damaged smartphone with swollen battery Setyawan Utomo Hadi/Shutterstock

Over the years, we’ve seen new features like charging limits, which help to stop your phone from charging past a certain threshold — usually something like 80% of the battery’s full charge. The reason these features have taken off so much is because they’re supposed to help limit the wear and tear on your battery, as many believe that charging your phone to 100% will diminish charging capacity overall.

This is another myth that appears to tie back to the older nickel-cadmium batteries of the past, as the memory effect could also come into play if you charged your battery to 100% too often. This was less of an issue if you completely discharged the battery, but it’s still an issue that popped up with those older battery types. Again, lithium-ions are a completely different chemical make-up, which has allowed for this to not be as much of an issue.

Yes, it’s still considered bad to charge your phone to 100% and leave it on the charger, as this leads to what’s called a trickle charge — in which your phone slowly uses power then recharges it. This causes increased heat and stress on the battery overall, which can lead to additional wear and tear over time. This is why we’ve seen features like optimized charging on the iPhones, which determines when you typically wake up and charges your phone the last 20% just before your alarms go off.

You should completely discharge your battery before charging

Graphic displaying 4% battery life with plug-in symbol above, person using laptop in background Jpkirakun/Getty Images

This is another myth that can be tied back to the days of nickel-cadmium batteries. As we mentioned before, the memory effect came into play quite a bit with these older batteries, making it important that you always completely discharge a battery and then fully charge it back to 100% to avoid having less capacity.

This is not the same with lithium-ion batteries like those found in smartphones and other electronics today. In fact, the opposite is actually true. That’s because the biggest sign of wear and tear on a battery is the reduction of its charging cycles — when the battery’s capacity has been completely used up. This is important, because all batteries are rated with an expected number of charge cycles before the battery begins to degrade past the point of its peak performance. The Galaxy S25 Ultra, for example, is rated for around 2,000 charge cycles, according to the European Product Registry for Energy Labeling. However, these expected charge cycles don’t mean the battery will be useless after that, it just means the capacity is expected to drop to around 80%.

This all ties into why you shouldn’t completely discharge your battery before plugging it in, and that’s because every charge from 0% to 100% is a cycle. However, if you charge your phone from 20% to 80%, you’re essentially turning one charge cycle into two, as you aren’t completely discharging and then recharging it. This means your battery capacity should ultimately last longer, as it’ll take you longer to run down your expected cycles.

You have to use the official charger from the brand that made your phone

Smartphone USB charging cable on wooden surface Pavel Kratirov/Getty Images

If you’ve ever read the instructions that come with your device, then you may have noticed some phrasing that essentially says you should only use official chargers made by the device’s manufacturer. The reason for this is because, for instance, if you’re using a Google Pixel 10, and you only use the charger that Google offers, then you’re ensuring your charger has the correct power specifications that the device is rated to accept. That means you don’t have to worry about the charger delivering too much voltage, as that can cause damage to the battery.

However, the myth that you have to use an official charger isn’t wholly true. While third-party chargers can be a waste of money, and the official charger is inherently safer because it’s already designed for your device, you can use other chargers. Using a third-party charger just requires a few extra steps to ensure you aren’t setting yourself up to damage your battery in some way. 

As mentioned, pay attention to the supported voltage of the device you’re charging and the charger you plan to use. Pushing too high of voltage into a battery that can’t support it can cause internal damage. Additionally, the fast-charging protocol used for charging is also important, if we’re talking about smart devices or those designed to be charged quickly. Different protocols will lead to slower charging overall, as the charger and device cannot properly communicate during the power transfer. You may need to do some research to ensure these ratings line up, but once you have, you’ll have a much easier charging experience, and ensure you’re charging your batteries safely.

Source

Posted on

Blue Or Red: Which USB Port Is Faster?

Close up of a motherboard back panel connectors on a dark background slexp880/Shutterstock

Universal Serial Bus or USB ports, particularly USB Type-A and Type-B, can have different colors, which are denoted by the color of the plastic insert present in the connectors. Blue USB ports, which are pretty common in modern computing devices, are often considered to be faster than other common ports, such as a black USB ports or white USB ports. However, if you have a red USB port on your computer, which is relatively less common, there is a high chance that you have access to a faster port than the blue USB.

The USB port color is typically associated with the USB generation supported by the connector, which determines how fast it can transfer data or its power capabilities. In some cases, the port color can also tell if the port has always-on functionality, which allows it to provide power or charge the connected device even when the computer is sleeping. For example, if a USB port is orange, it’s typically an always-on port, and can also support USB 3.2 Gen 1 (or USB 3.0) data transfer speeds. So, what are the capabilities of the blue and red USB ports, and how much faster is the red USB port? Let’s find out.

Red USB ports can reach up to 20Gbps data transfer rates

The presence of a blue plastic insert in a USB port indicates that it supports the USB 3.0 generation or SuperSpeed USB, which was launched in November 2008. Also known as USB 3.2 Gen 1, the USB 3.0 specification is capable of reaching up to 5Gbps data transfer rates and a power delivery of 900 mA at 5 volts (or 4.5W). In some cases, when a USB 3.0 port is dedicated to charging, it can deliver up to 1500mA at 5V for a total of 7.5W.

The red USB ports, on the other hand, are typically associated with USB 3.1, USB 3.2 Gen 2, or USB 3.2 (aka USB 3.2 Gen 2×2) generations, all of which are newer than USB 3.0, and can handle up to 10Gbps data transfer rates in the case of USB 3.1 and up to 20Gbps in the case of USB 3.2. The red USB ports are, however, similar in terms of power delivery, but you do get support for always-on functionality. So if your computer has both blue and red USB ports, there is a very good chance that you will get faster data transfer rates and support for always-on power on the red port. However, there is one big caveat.

Port colors don’t always tell the full story

While USB port colors are typically a pretty good indicator of what you can expect from a USB port in terms of data transfer and power delivery capabilities, it’s not always guaranteed. This is because the USB Implementers Forum (or USB-IF) has not made it mandatory to use specific colors with specific USB ports. It’s just a recommendation, which means device and motherboard manufacturers are free to use whichever color they want when including a USB port. While most do follow the common USB port colors, it’s not always a given. 

One example of a popular computer manufacturer not following this practice is HP, which includes black colored plastic inserts in the front USB Type-A port on its Omen 25L gaming desktop, despite those USB ports supporting USB 3.2 Gen 1 or 5Gbps data transfer rates. So it’s always a good idea to cross-check a USB port’s capabilities in the supplied literature by the manufacturer or by asking the manufacturer directly.

Source

Posted on

The 3 Cheapest Ways To Turn Your Tablet Into A

A tablet on a stand with a keyboard, being used as a PC in an office setting Ivan Pantic/Getty Images

We may receive a commission on purchases made from links.

While laptops are still great for taking your work on the go, they’re no longer the only option, or even the best one. These days, you can use a tablet instead and turn it into a solid laptop replacement. Over the years, tablets have become larger, clearer, and more powerful, and recent updates like Android’s desktop mode and new iPadOS 26 features that turn it into a touchscreen MacBook make it clear that developers are leaning into this functionality. 

Depending on the accessories you pick and whether you already have a tablet, this conversion will likely be far cheaper than purchasing a new laptop. Plus, you’ll have all the crucial capabilities of a laptop along with the flexibility of a tablet that is even lighter and more portable for your convenience. If you’re looking to change the way you use your device without breaking the bank, here are some settings and accessories that will help you turn your tablet into a laptop.

Enable desktop features you probably didn’t know about

A hand typing on a tablet being used as a laptop computer Korrawin/Getty Images

Recent updates make it easier to use your tablet like a laptop, but some of these features need to be enabled in your device’s settings. If you’re on iPad, go to Multitasking & Gestures in Settings to turn on Stage Manager. This feature gives you more control over the display by allowing you to group apps and move windows freely, which is great for multitasking and feels more like using a laptop or desktop.

As for Android tablets, those vary more from brand to brand. If you have a Google Pixel tablet, for example, a March 2026 Android update adds desktop mode. Samsung Galaxy tablets can use DeX mode, and Xiaomi Pad has Workstation Mode, both of which offer laptop-like displays with improved options for multitasking. 

Just going into the settings won’t turn your tablet into a functional laptop replacement on its own. Still, it’s the most important piece of the puzzle on the software side, and it’s 100% free. Knowing what your tablet can (or cannot) do can also help you decide if you need an upgrade, as older models may not have access to these kinds of features.

Pick the right keyboard and mouse

Hands typing on a tablet keyboard, with tablet supported in a case Freshsplash/Getty Images

There are plenty of keyboards out there that will instantly make your tablet feel and function more like a laptop or desktop computer. Apple’s Magic Keyboard is considered the best for iPad, but they start at $249, only $100 less than the cheapest iPad model. For a fraction of that price, you can get the Harvopu keyboard case on Amazon, which sells for between $25 and $35 depending on the color. For a platform-neutral option, consider eoso’s TouchPad Keyboard case, which currently sells for $36.99 and fits any tablet between nine and 11 inches.

These two accessories stand out for their trackpads, a feature not many keyboards in this price range include that helps emulate the laptop experience. Depending on personal preference, you may be able to forgo a mouse and use either a trackpad or the touchscreen. If you do want a mouse, most any USB or Bluetooth model will do, but some cheap but reliable options include the Logitech B100 ($7.99) and the Logitech M196 ($14.99), both of which have over 4.5 stars (out of five) on Amazon and lots of positive reviews.

Increase utility with other accessories

A USB hub attache to a computer, blurred in the background Galina Vetertsovskaya/Getty Images

Adjusting system and display settings and adding a keyboard will make your tablet look and feel more like a laptop, but there are other things you’ll need if you want it to be a true replacement. First, a USB hub will open up more options for storage and accessories, especially on an iPad, which notoriously only has its charging port. These devices start around $10 on Amazon, with the BENFEI USB C Hub 5-in-1 being a cheap and popular option.

You’ll also need to increase your tablet’s storage capacity and battery life if you want it to be as efficient as a laptop. Starting with storage, cloud solutions are the easiest and cheapest option, at least in terms of upfront costs. Price and features vary depending on which service you use, but iCloud+ starts at $0.99 a month for 50 gigabytes, and Microsoft 365 and Google One’s Basic plans give you 100 gigabytes for $1.99 per month. If you’d rather avoid the cloud or a subscription, there are external storage options. An external SSD is ideal, but the reliable ones are pricy, so a USB flash drive will often suffice.

Finally, if you want to take your computer on the go and don’t want to be wired to the wall, get a power bank to give your battery life a boost. As with other tablet accessories, they vary greatly in price, but there are decent ones available for around $20, like the INIU Portable Charger. With the right accessories and settings, you can turn almost any modern tablet into a working laptop substitute without spending a fortune.

Source

Posted on

7 Common Mistakes That Could Cost You All Your Data

A depiction of a data backup being carried out as a person types on a keyboard Chiewr/Getty Images

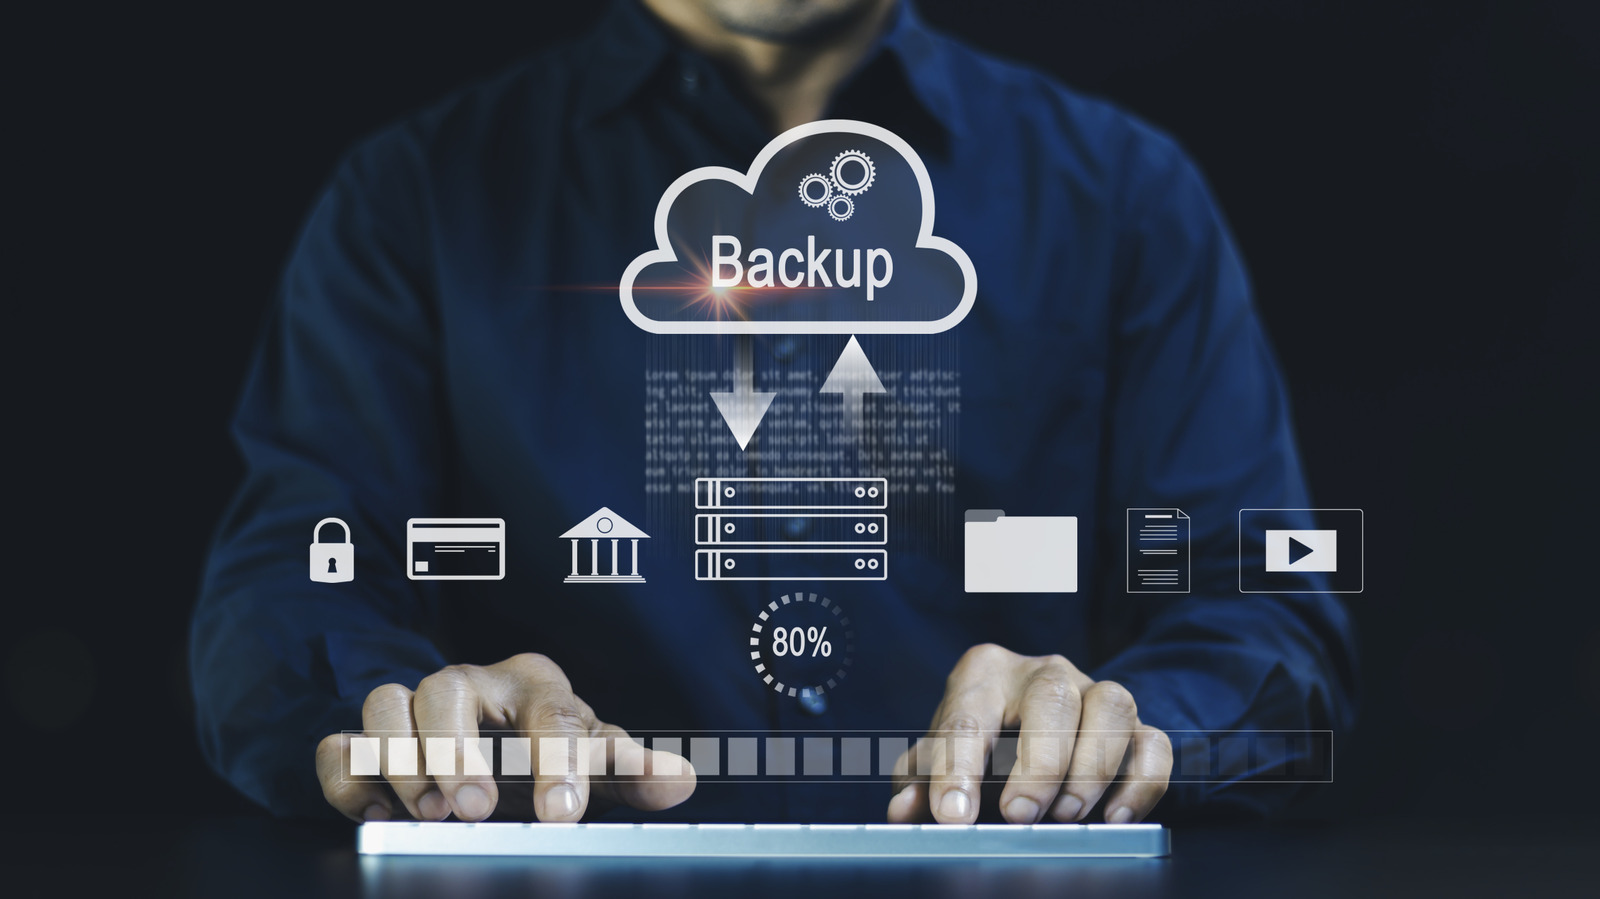
In the modern digital age, where people have all manner of sensitive files and information stored on their computers, it has become more important than ever before to safeguard their data from harm. Some people are lackadaisical in this department, which can have grievous repercussions when an unforeseen issue leads to a massive chunk of your data going down the drain. If you don’t have a backup handy, then say goodbye to all the important information you’d spent years gathering.

Instead of blaming any external problem for this data loss, you’re better off taking preventive measures and avoiding the common data mistakes many people make. We highly recommend that you back up your PC often and check if it’s protected from any debilitating attacks or incidents.

Never use data backup and cloud storage plans

A glowing cloud icon operating over a circuit board Sankai/Getty Images

Given the many ways you can store your data on the cloud, it would be a huge misstep if you decide to ignore this crucial service and choose to either keep your data backed up offline only… or not at all. This puts your data at risk if an unforeseen issue causes your PC to lose everything. 

While you can always rely on free plans for backup purposes, keep in mind that these services are usually limited, either in terms of storage space or features. This is why you should shell out some money for a data backup subscription, ideally for a reliable, cost-effective service that does justice to your investment and gives you a reliable option to safeguard your data from getting wiped.

Your options are massive. Google Drive, Apple iCloud, and Microsoft OneDrive are the three usual providers that are the easiest to use and give you a simple, easy-to-access cloud platform where you can store your data, although free storage is limited to 15GB for Google Drive and 5GB for the other two. If you need more space for your backup, pay for a plan that lets you store all your data with ease. However, if you want to check out other services that rival these cloud services in efficiency — and even surpass them, in some cases — then why not try Dropbox or IDrive? Finally, if you don’t mind dealing with complex interfaces when backing up your data, services like ShadowProtect SPX, Acronis True Image, Backblaze, and pCloud are worth considering.

Run insecure, risky programs regularly

A vector depicting a laptop showing a loading progress bar Lysenkoalexander/Getty Images

When it comes to running third-party programs, most people believe that Mac is more secure than Windows. The built-in XProtect malware-detecting software, along with Gatekeeper’s runtime protection, means that your macOS device should be free from any debilitating third-party software. However, this isn’t an absolute truth, and being careless leaves both Windows and macOS at risk of viruses and malware that eat into the system and make it unusable, possibly forcing you to wipe your hard drive and start fresh.

The obvious step to avoid this issue is to avoid any untrustworthy third-party apps. This might not be ideal for people who want to run certain programs that seem useful, despite causing an alert from Windows SmartScreen to pop up whenever they try to run them. In this event, a valid course of action is to run Windows Sandbox, which serves as a virtual machine segregated from your main device. It’s simple to use and provides you with a staging ground to run suspicious apps and see whether they perform as advertised… or just want to corrupt your data.

While macOS lacks an ingrained virtual machine that you can use to recreate this effect, there are alternative third-party solutions like UTM and VMware, which are free, trustworthy, and give you the peace of mind you need to install third-party apps and see whether they’re secure enough to warrant a place on your main system.

Fail to follow the 3-2-1 rule

A backup interface floating over a keyboard that a person is typing on Hirun/Getty Images

The golden 3-2-1 rule of data backups states that you should maintain three copies of your data, two of which are on different devices, and one of these is offsite and away from your PC. A good example of this would be to keep your data on your computer, an external hard drive, and the cloud. The computer and your hard drive become two different physical devices, while cloud storage takes care of the offsite data requirement.

As online data backups have become more prevalent, this rule has changed somewhat to accommodate these changing times. One notable tweak is the 3-2-1-1-0 rule, which entails that at least one backup copy of the data should always be offline. Hammering in this fact is important, since most people keep copies of their data on two different cloud storage services and call it a day. If hackers get your personal information and target both these sources, say goodbye to all your data. Along with this, the “0” is meant to push you to double-check your backed-up data and ensure that it’s error-free.

On top of this, there’s a 4-3-2 backup rule. It states that you should have four copies of your data, including your main system. The three backups you’ve made should be stored in different forms of media. Two of these data backups should be kept offsite, far away from your main system. Usually, a cloud storage service takes care of this. Alternatively, use an old hard drive and safely store it in an electrostatic bag that you can keep in a secure location.

Ensure that your system is safe and protected

An antivirus working on a laptop Andreypopov/Getty Images

The importance of antivirus software can’t be overstated. Defender on Windows and XProtect on macOS are both ingrained software that are effective enough to get the job done without any outside help. However, that doesn’t mean you should leave it as is and not configure any settings to further safeguard your device. While XProtect works automatically and doesn’t let users access its settings, the same can’t be said for Windows Defender.

Go to the Windows Security tab in your Settings, and you’ll see a wealth of options that you can peruse, double-check, and customize to your liking. “Virus & threat protection” lets you carry out scans, manage its settings, and even set up OneDrive if it isn’t already to protect from ransomware attacks. Aside from this, other relevant tabs that will help unlock the highest level of protection possible for your Windows PC include “Firewall & network protection” and “Device security.”

You can take additional steps that aren’t limited to your OS’s ingrained protection measures. A third-party software to detect and get rid of viruses and malware can be a great addition to your PC, with Avira Antivirus Pro considered the best antivirus software for Windows by Consumer Reports. Ensure that your system has the latest security updates to prevent any outdated protocols from being targeted by hackers. Your Wi-Fi network should also be safeguarded to block any access from suspicious individuals. Last but not least, if you have multiple smart home devices, then we highly suggest that you connect them to a separate mesh network like Zigbee or Z-Wave to prevent them from serving as a gateway for hackers to infiltrate your network.

Rely on an SSD for an offline data backup

A portable external SSD placed on a laptop Teacher Photo/Shutterstock

It’s understandable why beginners to data backup would purchase a fast, portable solid-state drive to store their data in. However, this is a very costly mistake that can cause your data to be corrupted when this drive is not in use. This is because SSDs use NAND memory flash cells, which require a regular inflow of electricity to charge these components and keep them active. Even when not in use, these cells hold a charge that slowly leaks over time.

For drives in regular use, this isn’t a big deal. However, for long-term storage, an SSD is far from reliable. Usually, these solid-state drives can last for a few years with this ingrained charge before it loses power and your data is lost forever. In case you feel that you back up your data regularly enough for this external SSD to never lose this charge, keep in mind that hotter temperatures will cause the drive’s charge to degrade faster.

So, you’re better off not taking this risk and resorting to a regular HDD for all your storage needs. Will the process of copying over data be slower? Sure, but what you’ll get in exchange is a backup drive that can be left inactive for years without any fear of data loss. This is because hard disk drives use magnetic platters to store data, which don’t require an electrical charge to remain functional. So, if you have an old external hard drive lying around, it’ll be perfect to turn into a cold storage device. That said, HDDs have moving parts that can seize and fail if left idle too long. 

Never account for power outages and surges

Checking a fuse when the power is out Proxima Studio/Shutterstock

A power outage can be a major issue to deal with for people who use their system constantly. Without a backup system set in place, your computer can shut down at inopportune moments, with this instant loss of power leaving your data at risk. Sometimes, localized packets of data will be corrupted, such as your game’s save file that was in the middle of an autosave process, or a media file that was in the middle of being copied right before the power went off. However, if your system was in the middle of a software update when a power outage hit, then you might have to say goodbye to your data as you format your corrupted hard drive and install your OS from scratch.

Power surges can also be a major hassle to deal with, for understandable reasons. While outages may not be all that damaging unless you’re very unlucky, voltage fluctuations aren’t as lenient and will turn your hardware into a smoking piece of junk if you don’t set certain safeguards in place. A massive power surge can fry your device’s internal components, easily and irreparably breaking your computer.

To prevent data loss from a power outage or a surge, a UPS is your best bet. As the abbreviation suggests, this uninterrupted power supply gives you the time you need to safely shut off your system in the event of a power outage, holding enough charge to keep the system active as you perform the needful. Another lesser-known feature of UPS appliances is that they come with surge protection, regulating voltage in the event of a sudden spike and saving your hardware from destroyed.

Become lax about regularly testing your data

An exaggerated depiction of data inspection on a laptop, with a person using a magnifying glass to inspect documents Champpixs/Getty Images

Are you careful about carrying out backups to multiple sources and following the best practices to safeguard your data? Great! However, the data backup journey doesn’t stop here — you also need to be prudent when it comes to checking whether your data has been backed up flawlessly. This quality check is something that most data backup newbies skip, which is a critical mistake and can leave you in a dire situation if your data is lost and the backup you were confident about ends up being corrupted.

Meanwhile, if you check your backup right after it’s completed, you can cover three major bases. Firstly, you’ll be able to identify firsthand whether this data is perfect or corrupted, with the latter situation meaning that you’ll have to carry out the backup again and see why this data is exhibiting such errors in the first place. Along with this, you’ll also be able to identify if a data backup is incomplete and change the settings accordingly so that all relevant data is backed up. Finally, you can instantly gauge the effectiveness of the data backup service you’re using and see whether you should stick with this program or opt for something else if speed and quality are lacking.

Source

Posted on

The One Tired Trope MCU Boss Kevin Feige Said Marvel

Kevin Feige in a Spider-Man: No Way Home baseball hat DFree/Shutterstock

Regardless of where the Marvel Cinematic Universe might’ve ended up in recent years, there’s no question that Marvel Studios head, Kevin Feige, has made the right calls for some of its most pivotal moments. Heroes and villains have been brought to life by stars audiences can no longer separate them from, and well-known storylines and events have taken detours that have even left comic book fans agog at where they went next. For Feige, though, there was one golden rule that he was set on the franchise never breaking, and it involves avoiding a trope that it has done for most of the films and television shows that followed.

In an interview with Rotten Tomatoes, Feige explained that he would usher in a new era of superhero movies and change how women would play a role in them. “From the beginning of my career, the notion of the damsel in distress was outdated, and when we started to make our own movies, we didn’t want to fall into that trope –- we wanted to avoid it as much as possible,” explained the massive mind behind the MCU.

“We really wanted to create these female characters that were as strong and as capable as the heroes. Now, as we’ve continued to grow, that’s gotten even more apparent, to the point where they are the heroes.” It’s this kind of mindset that has led to some of the best moments in the franchise, and what fans could be getting more of in the future, whether some fans like it or not.

Review bombs can’t stop female superheroes powering through the MCU

Pepper Potts, Captain Marvel, Scarlet Witch, Nebula and Shuri together in Avengers: Endgame Marvel Studios

While Feige might’ve been fighting for a progressive franchise, certain chapters that tried to be shining examples of that didn’t always land as well as others. Shows like “She-Hulk: Attorney at Law,” and “Ms. Marvel,” while some of the MCU’s most confident shows, were review bombed from week to week (via Forbes). Be that as it may, there were thankfully still some entries into the world of thunder gods and rage monsters that were hits, and sparked fan demand for more of the female characters that fought alongside them.

“What Ryan Coogler did with Okoye, Nakia, and Shuri in ‘Black Panther’… they’re already iconic characters, and people are already asking, ‘When are they getting their movies? When are we getting the Shuri movie?'” Feige added. “The answer is: Nobody wants to see that more than me. And that’s a testament to that film and to those actresses. And to the world being ready, and overdue, to see these types of characters on the screen.”

As it stands, Phase Six of the MCU will be coming to an end this year with “Avengers: Doomsday,” with no solid details on what comes next. Thankfully, with heroes like Yelena (Florence Pugh), the Fantastic Four’s Sue Storm (Vanessa Kirby), and the current Black Panther, Shuri (Letitia Wright), making an appearance to join the fight against Victor von Doom (Robert Downey Jr.), Feige’s rule doesn’t look to be getting broken any time soon.

Source

Posted on

How Often Should You Back Up Your Phone?

A man's hands on a phone. sebra/Shutterstock

It has probably happened to you before, or at least someone you know. You lose your phone, it’s stolen, or it goes kaput. With it goes all your precious photos, videos, and other important content. This is an easily avoidable issue by keeping your phone backed up on your computer or a separate drive. Some also work with companion services like Apple’s iCloud or Google Cloud. 

While you know how important it is to back up your phone, you might wonder how often you should do it. While there’s no specific right or wrong answer, most experts agree that you should do so at least weekly, depending on how much new data is added to your device. For casual users, weekly or biweekly might suffice. You can get away with monthly if you don’t often save much new data to the device. On the other hand, if you take a lot of photos, save a lot of important files, log notes, or anything else that involves potentially important data, you might want to back up your phone daily.  There’s no harm in backing up more frequently to avoid data loss, whether it’s that video of your toddler’s first steps or the audio recording of an important overseas business meeting.

When deciding on a backup schedule, consider how important your data is and how you may lose it. If you travel often, there’s a greater chance your device will be lost or stolen. If it’s a phone for a child or teen, you might want a safeguard in case they misplace or damage it. If the phone isn’t durable or is on its last legs, backing up gives you peace of mind that you have all your data to copy over to a new device.

What options do you have for phone back ups?

A woman sitting on a chair tapping her phone. pics five/Shutterstock

If you’re worried about losing data, daily, automatic cloud backups might be the way to go. Once turned on, this works as long as the phone is plugged in and connected to Wi-Fi. With both Apple iCloud and Android, you can customize what content you back up, choosing only the most important data to conserve space in your account. Note that both iCloud and Google provide limited storage for free, after which you’ll have to pay for a subscription. If preferred, you could use one of the other popular cloud storage apps, such as Dropbox or OneDrive. 

If you want to avoid the cloud or don’t have access, you can back up your iPhone to a laptop using iTunes on both Mac and Windows devices, or your Android device using file transfer on a Windows PC or Android File Transfer on a Mac. A new Android feature may use Quick Share to back up files to your PC, too, but it’s not out yet as of this writing. For physical backup you keep locally, copy important files to a portable hard drive at a desired frequency.

The cloud is the simplest option, and if you want to stick within the free tier, occasionally clean out your phone and your cloud files by removing duplicates, bad photos, or items you no longer need. Whichever method you use, at the very least, light users should back up once a month, casual users should back up weekly or biweekly, and heavy users should set up a daily automatic backup for important files.

Source

Posted on

Why Some USB-C Cables Charge Faster Than Others

Close up of a USB Type-C cable connector with a blurred background. Thomas Nuehnen/Getty Images

Have you ever plugged a fast-charging-capable device, like a smartphone, into a USB-C cable that only charges slowly? It happens to the best of us. It’s because, although the USB Type-C standard ensures most connectors are similar, it doesn’t necessarily standardize the technology inside the cable. Not all USB-C cables are created equal. If you’re wondering why the USB-C standard matters so much then — and that’s a valid question — it’s because it makes device ports and connectors on cables and attachments fundamentally more versatile.

You still need to be aware of a cable’s power output. USB-C is actually spread across several variants, where standardization exists for the connector. It starts with USB-C 2.0, the entry-level version, capable of data transfer rates up to 480Mbps. From there, you have USB 3.2 Gen 1, Gen 2, Gen 2×2, and USB 4, which has PD (power delivery) support, and Thunderbolt. USB-C PD supports fast-charging with power delivery up to 100-watts in some cables and with a maximum of 240-watts in newer cables.

Because it can be confusing, the best explanation is that each version of USB-C is capable of delivering different power outputs. You need at least 18-watts or higher to facilitate fast-charging. Ideally, for modern devices, you want a 40-watt to 65-watt charger and cable, depending on the device’s power requirements. If you use a cable that’s not rated for higher power output, it doesn’t matter what the power adapter delivers, your devices won’t be able to fast-charge. The cable limits the amount of power supplied. Moreover, there are specialized cables for data, video, audio, and power over other options.

What changes the charging performance of a USB Type-C cable?

Someone holding a USB-C cable in one hand and a smartphone in the other. Denis Borisov/Getty Images

The connector for USB Type-C is the standardized piece you’ll recognize that makes it easy to link modern charging cables and data cables between compatible devices. It’s reversible and shares the same design across platforms. But it’s what’s inside the cable that truly influences the power capabilities of the entire connection.

The cable “gauge” or the thickness of the wires inside determines data or power limits. A lower gauge number means a thicker design while a higher gauge number means thinner. Higher gauges can interfere with efficient power delivery, resulting in less power flow and slower charging times. The cable length can also change the performance of the cable. Longer cables must deal with more resistance, which means more power or voltage loss and decreased charging rates.

The final piece of the puzzle is general compatibility. For example, the PD or power delivery standard is necessary for high power output. If the cable in question doesn’t support PD over USB-C, you won’t be able to get the high wattage necessary for fast-charging. Moreover, because some cables are specialized, if you opt for a data cable over one that prioritizes power delivery, you might see slower charging speeds.

How do I tell which USB-C cable is the right one to use?

USB-C cable resting near the proper USB port on the bottom of a smartphone. Skrypnykov Dmytro/Shutterstock

USB-C cables are manufactured in various ways — that’s exactly why they’re not all the same. The easiest way to identify a cable’s specifications is to read and follow the manufacturer’s product information, whether on the brand’s site or the retail listing. That may not always be available, in which case you can look for a certification logo from the USB Implementers Forum (USB-IF). It should appear on the original cable’s packaging and sometimes, very rarely, on the cable itself. Certified cables have passed the necessary tests for high-performance.

You can also consider features like the thickness and feel of the cable, whether it’s braided or made of premium materials, and whether or not the e-marker chip is present in high-power cables. That chip, which stands for Electronically Marked, exists in cables rated for 60-watts and above and acts as a safety controller preventing more power from flowing than the cable can handle. If the chip isn’t present, and the cable advertises 60-watts or above, it’s a safety hazard.

Ultimately, if you have trouble finding information about the cable’s PD support or specs, cannot identify any USB-IF logos on the packaging, or if it seems cheap, you’ll want to steer clear. There is a lot of confusion around USB-C, beyond just the cables. If your device isn’t fast-charging, there is a chance that it’s not because of the cable. For instance, a common myth about USB-C ports is that the ports themselves are all the same — they’re not. Some ports may support high power delivery and fast-charging while others don’t.

Source